Refrens helps you seamlessly record, track, and manage all your purchases and expenses in one place.
Here are the main features of our Purchases & Expenses module:
1. Record all your purchases (inventory, raw materials, etc.), Expenses (utility bills, rent, office supplies, etc.), and Petty Expenses in one place.
2. Track unpaid and paid (partially/fully) Purchases/Expenses with ease.
3. Generate detailed reports for accounts payable (vendor reports, payment reports, TDS reports, GST reports, etc.)
Let’s see how:
Recording Purchases & Expenses
Firstly go to Accounting > Purchases & Expenses from the sidebar:
As highlighted above, you will see the following options:
1. Record New Expenditure
2. Record New Purchase
3. Request an Invoice
4. Bulk Upload Purchases/Bulk Upload Expenditures
Let’s take a look at each of these:
1) Recording A New Expenditure
To record expenditures (such as utility bills, rent, office supplies, etc.) click on “New Expenditure” to get started:
This will redirect you to the expenditure creation page:
Start by adding basic details such as Expense Date, Vendor, Expense Number, Vendor Invoice Number (If you have one), and currency.
Next, you will see an option called “Select Tax Type”:

Here you have two options:
1. If your expense does not include any tax, Select “None”.
2. If your expense also includes tax, Select the type of tax applicable - i.e. GST, VAT, SST, HST, etc.
Note: India users, after they select “GST”, will also see an additional option to select the tax type as well. I.e. IGST OR CGST & SGST:
Then just add the Tax rate and Total expense amount. Once you add the amount, you will also see an option to choose if that amount is inclusive or exclusive of taxes:
As you see, the system will automatically show you the bifurcation of your pre-tax and post-tax amount for your convenience!
Next, if you are doing your accounting on Refrens, you can also choose the respective Expense Ledger where this expense will be recorded. You can also add Notes and attachments if any:
Next, if this is a recurring expense for you, you can automate it by turning the toggle on:
As you see, you have an option to select the expense frequency at which you want the expense to be created (Every week, every month, etc.). You can also choose if you just want to keep these expenses in draft or directly save them in the system.
Next, if you are yet to pay for the expense, click “Save & Continue” OR if you have paid for the expense, click on “Save and Marke Payment” to record payment details as well. (Learn more about recording payments later in this article.)
That's it! Your expense has been successfully recorded in the system!

You can also use the same method to record petty expenses (i,e. Small expenses such as buying a pen, tea, refreshments for employees/guests, courier charges, etc.). For that, just select “Petty Expenses” in the "Select Vendor" dropdown while recording the expense as shown below:

2) Recording A New Purchase
To record purchases (Inventory, Raw materials, etc.), start by clicking on “Record New Expenditures” on your Purchases & Expenses dashboard.
This will redirect you to the Purchase Record page like the one below:

As you can see, this is very similar to the way you create invoices. So we will not get into more details in this article. If you still have any questions, do feel free to reach out to us at care@refrens.com OR on chat support.
When you record a purchase, Refrens also automatically updates it in your inventory as well. For example, if you look at the purchase we recorded above, you will see that we bought 10 wooden blocks.
Now, let’s go to our inventory dashboard to see how it is reflected:
As you see, the system has automatically updated your inventory based on your purchase record. (You can learn more about our Inventory Management here>)
3) Requesting an Invoice from your Vendor with RFI links (and converting it into a purchase record in 1-click)
Learn more about creating & sending RFI Links>
4) Bulk Upload Purchases/Bulk Upload Expenditures
If you are dealing with a large volume of purchase/expense transactions, our bulk upload feature helps you create bulk purchases/expenses in seconds by just uploading a CSV file.
Recording & Tracking Payments Made against Purchases/Expenses
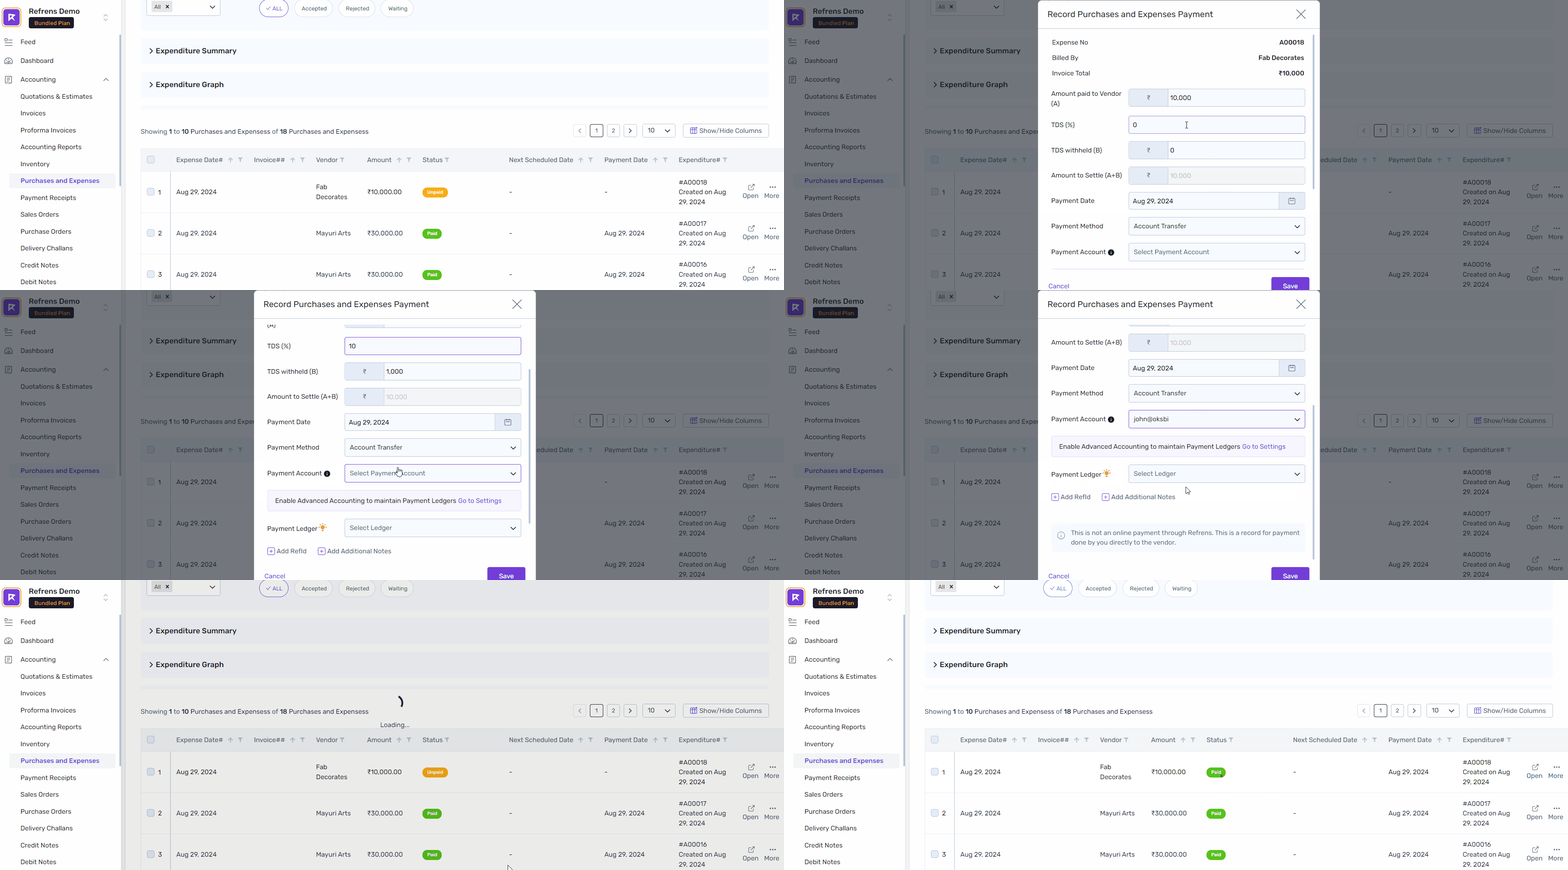
To record the details of the payments made, just go to the respective purchase/expense and click on “Mark Paid”:

Then fill up the payment details such as amount, TDS, payment method, payment account, etc. as shown below:
You can also track the payments made/pending/overdue etc. directly from the dashboard:
Viewing Auto-generated Reports
Based on your purchase & expense records, Refrens will automatically generate all your accounts payable reports such as Vendor Report, Payment Report, TDS Report, etc.
You can access them from your Purchase & Expense dashboard under Reports section:
Viewing Purchases/Expenses/Petty Expenses Separately
If you just want to view your purchases or expenses or just petty expenses, you can use the "Expense Type" filter on your dashboard:
That’s it! Managing all your purchases & expenses on Refrens is that simple! If you still have any questions, feel free to drop an email at care@refrens.com or reach out to us on chat support for quicker assistance.
P.S.: Are you dealing with a large number of freelancers, consultants, contractors, or vendors? Refrens can help you manage their invoicing & expense tracking with ease. Take a look at this case study on how we are helping Upgrad manage their invoicing & expenses for 1000s of instructors>
