If you are a business operating in Saudi Arabia, you are required to comply with the ZATCA guidelines for generating e-invoices.
In this article, we will see how you can comply with the ZATCA Phase-1 and Phase-2 guidelines with Refrens.
To get started, go to Business Settings > ZATCA E-invoicing:

As you see, there are two options: ZATCA Phase 1 and ZATCA Phase 2.
ZATCA Phase 1: By enabling this, you can generate ZATCA-compliant QR codes automatically for all tax documents - including invoices, credit notes, and debit notes.
ZATCA Phase 2: This comes with advanced e-Invoicing features including real-time clearance, digital signatures, and ZATCA platform integration.
Let’s take a look at both.
ZATCA Phase 1
With ZATCA Phase 1, you can generate ZATCA-compliant QR codes automatically for all tax documents - including invoices, credit notes, and debit notes.
To enable this, just turn the toggle on as highlighted below:

Once enabled, a ZATCA-compliant QR code will be attached to your Invoices, Credit Notes, and Debit Notes once you save them (as shown below):
This QR code can be scanned with a ZATCA QR code scanner app for verification purposes.
ZATCA Phase 2
ZATCA Phase 2 comes with advanced e-Invoicing features including real-time clearance, digital signatures, and ZATCA platform integration.
1) Setting Up Integration
To enable ZATCA Phase 2, start by clicking on the Sign-Up button as highlighted below:

Then you will see a pop-up form like this:
Refrens has partnered with Complyance.io to integrate our system with the ZATCA platform. With this, you can automatically create Phase 2-compliant E-invoices seamlessly.
So to get started, you will need to get API keys from Complyance.io. if you are a first-time user, just select “I do not have an API key” and click on “Continue”.
You will see a signup form for Complyance.io. Add your official email address and set a password to finish the signup:
Once the signup is complete, you will see the following pop-up:
Click on “Go to Compliance” OR visit https://app.complyance.io/signin. You will see the sign-in page:
Use the same email and password you entered in the signup form earlier to log in to your Complyance account.
Then return to your Refrens account and go back to ZATCA E-invoicing settings.
Your Complyance account credentials and status will be visible here: The next step is to get your API Keys from your Compliance account. To do that, click on the “Edit” icon:
Then click on “Get API Key from Complaynce” OR visit https://app.complyance.io/apikey. This will redirect you to the API Key generation page on your Complyance account.
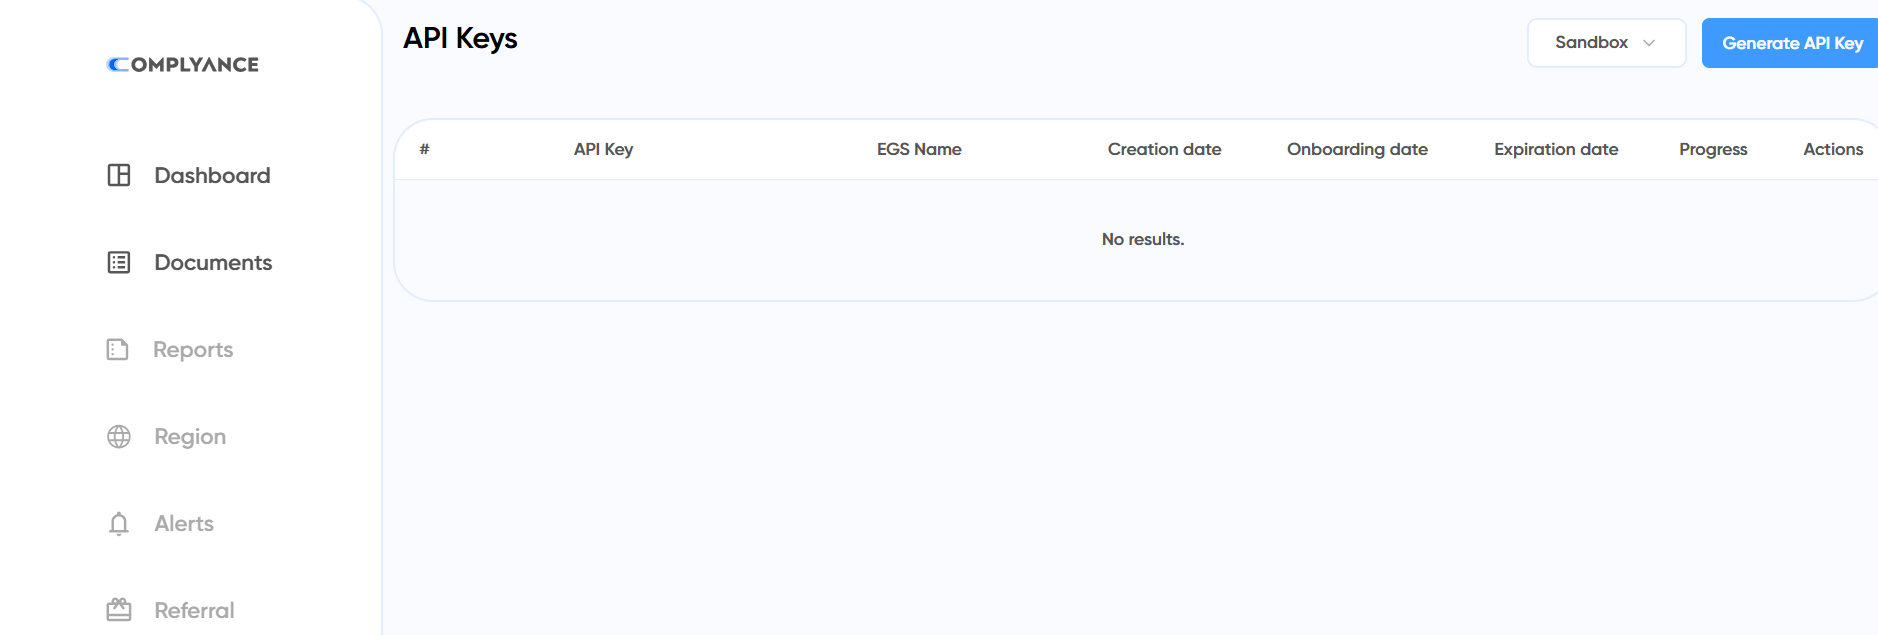
On the top right corner, you will see three dropdown options to generate the API keys:
1) Sandbox 2) Simulation 3) Production
If you want to test the API integration before using it, you can choose Sandbox OR Simulation option. Here is the difference between the two testing methods:
| Testing Category | Sandbox | Simulation |
| Company Data | Using Dummy Company Data | Using Real Company Data |
| E-invoices | Dummy E-invoices Created | Dummy E-invoices Created |
| Authentication Process | Not Required | Using Fatoora Authentication Process |
You can select the “Production” option to get the Production API keys to start generating real e-invoices.
Once you click on “Generate API Keys”, it will show up on your dashboard:

Now, you will need to add your company details for verification purposes. To do that, click on the “Onboard” option highlighted above.
This will redirect you to the onboarding page:
Fill up your company details such as Name, Address, VAT number, etc., and click on “Proceed”.

You will have to add your 6-digit Fatoora portal OTP for authentication.
(Note: if you are generating API keys for Sandbox OR Simulation, just add “123456” to proceed.)
To generate OTP in the Fatoora Portal:

1) Login to the Fatoora portal.
2) Click Onboard New Solution Unit/Device.
3) Enter the number of devices for which you want to generate OTP. If you’re using only Refrens, enter 1.
4) Your OTP will be generated in the portal.

Important: The OTP generated by the Fatoora portal will be valid only for one hour
Add the OTP and click “Onboard” to finish onboarding.
Your API key progress status will change to “Live”:

This means you can start using the API keys for E-invoicing. Just click on the copy icon to copy the API keys from here.
Then go back to the ZATCA E-invoicing settings on your Refrens account > click “Edit” > Paste the API keys and click “Continue”:

That’s it! Your ZATCA Phase-2 API Integration is successful. You can now start generating ZATCA-compliant E-invoices seamlessly on Refrens!
2) Creating Documents
Once the integration is set up, you can start creating E-invoices.
But before that, while creating your invoice or credit note, you need to keep a few things in mind to avoid facing any errors.
2.1) VAT Numbers & Additional IDs

Billed By Section: Both VAT Number and an Additional ID are mandatory. Additional IDs include NAT (National ID), TIN (Tax Identification Number, IQA (Iqama Number), PAS (Passport ID), CRN (Commercial Registration Number), MOM (Momra Licence), MLS (MLSD License), SAG (Sagia Licence), GCC (GCC ID), and OTH (other ID).
(Note: In case you only add the VAT Number, your E-invoice will still be cleared - but it will be cleared with a warning. So, we recommend that you also add an additional ID in your Billed By details to ensure full compliance.)
Billed To Section: Either a VAT Number OR an Additional ID is mandatory to have.
To add a VAT ID or an Additional ID, go to the "Tax Information" section in the Billed By/Billed To details: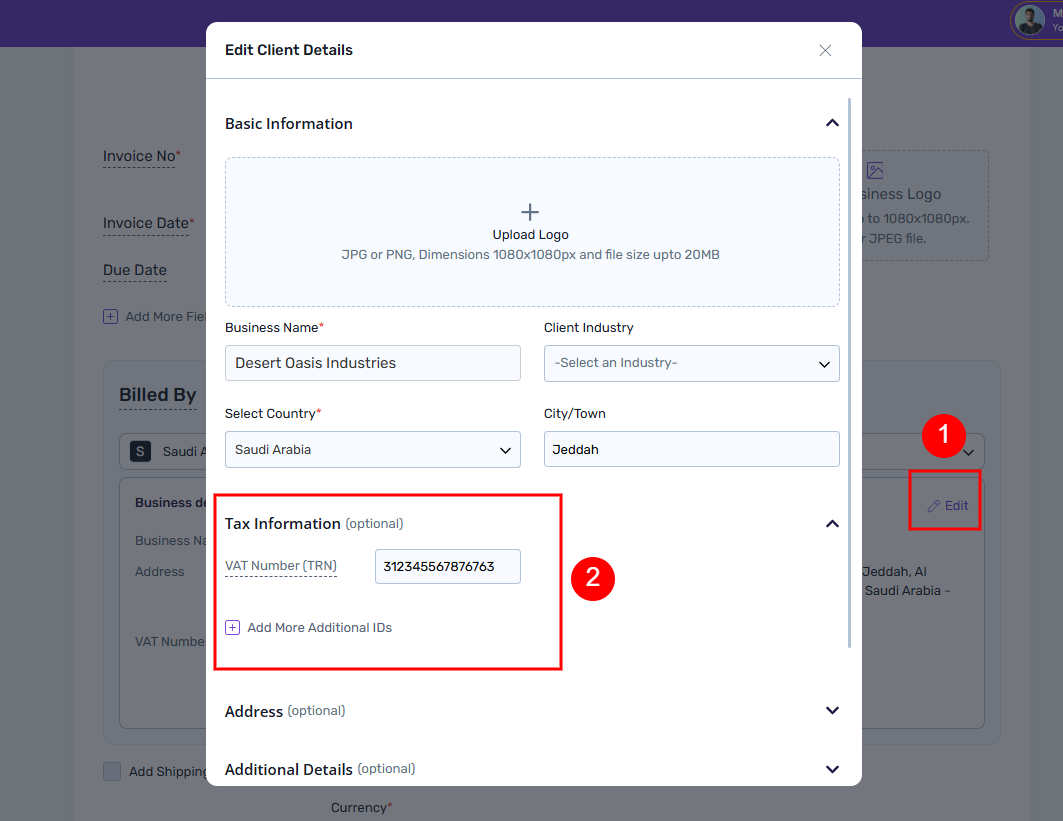
To Add an Additional ID, click on the "Add More Additional IDs" option:

As you see above, you can select from the multiple dropdown options to select and add the ID type & Number.
Ensure that you have ticked the "Use for E-invoice" check box to use a particular ID for E-invoicing:

(Note: If you have added multiple Additional IDs, you can only use one of them for E-invoicing.)
Generating a B2C E-Invoice? Select "Individual" in the client type field:
2.2) Address Details
In both Billed By and Billed To sections, ensure that you have filled up address details completely to avoid any errors:
2.3) VAT Categories
Ensure that you have selected the correct VAT category for each of the items:
Once you select a VAT category, you can also specify the reason if applicable:
3) Generating E-invoices
Once you are done saving your invoice, you will see the "Generate E-invoice" option on the Invoice preview page:
When you click on "Generate E-invoice", you will see your invoice details in the preview form:
Verify these details and click on "Generate" to continue.

That's it! Your E-invoice is generated. Click on "Download E-invoice" to get the PDF of the same.
You can also download the PDF later on from your document preview page under More > Download ZATCA PDF:
If you still have questions, feel free to drop a message on live chat support OR drop an email at care@refrens.com for quick assistance!